Multi-page Layout
This section introduces the multi-page layout concept.
-
First, an introduction explains the Terminology and Relevant Classes.
-
To learn how to run the algorithm and process its results, refer to sections Running a Multi-Page Layout and Processing the Result.
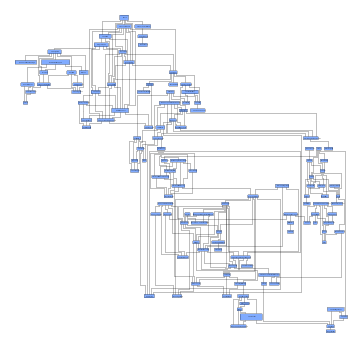
Multi-page layout enables the presentation of large graphs in a clear and easily navigable manner. It breaks down a given graph into a set of smaller graphs, so the layout of each smaller graph fits within a specified width and height.
A multi-page layout, with its set of smaller graphs, avoids common presentation problems that occur with large graphs containing many nodes and edges. For example, graph elements may be hard to discern because of a small zoom level when viewing or printing the entire graph. Also, long edge paths may be hard to follow over many poster pages in a poster print-out of a graph.
The algorithm aims to find the optimal set of smaller graphs whose layout uses the specified width and height as efficiently as possible. It puts as many elements as possible from the original graph into each small graph, thus minimizing the number of resulting small graphs.
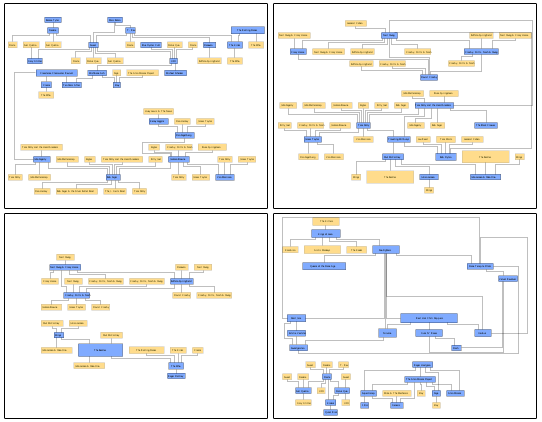
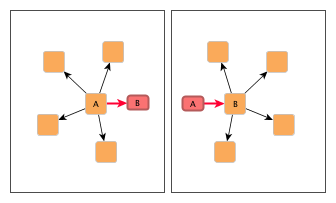
Breaking apart the original graph is done by subdividing it. For each connection between two nodes that is cut, additional nodes and edges are introduced as proxy elements in both of the smaller graphs involved.
The proxy elements in each small graph represent the original edge and can be used to navigate to the corresponding other small graph.
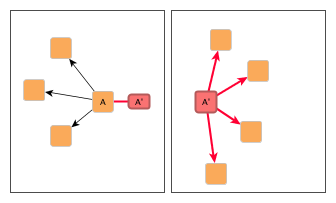
Subdivision can also take place at the node level, where nodes with many connections are split up into multiple “parts” that are distributed to different small graphs. This also introduces additional nodes and edges as proxy elements in the smaller graphs involved.
|
Important
|
In contrast to the major layout algorithms of yFiles for HTML, multi-page layout produces a set of graphs instead of a single graph as its result. |
Terminology
The original graph that is given to the algorithm is also called the model graph. The smaller graphs that result from subdividing and augmenting the model graph are referred to as the page graphs.
The additional nodes and edges that are introduced to represent an edge from the original graph between two nodes which are in different page graphs after sub-division, are called connector nodes and connector edges, respectively, or often simply connectors.

Further nodes and edges are added when a node with many connections needs to be split up into multiple parts in order to be able to assign these parts to different page graphs. Each of the parts gets an equal share of the original neighbor nodes (roughly).
The additional new parts of the original node are called proxy nodes, all edges incident to them are called proxy edges. They represent the connections between the original node and its neighbors.
For each of the proxy nodes in other page graphs, the original node gets a so-called proxy reference node as a new neighbor. The connecting edge to this new neighbor is called proxy reference edge.


Relevant Classes
The following table lists the relevant classes and interfaces for multi-page layout:
| Classname | Description |
|---|---|
Main algorithm. See the description below. |
|
Layout data class to provide additional item-specific options. Can be created using the factory method createLayoutData. |
|
The container that holds the results of a multi-page layout, i.e., the page graphs. See section Processing the Result. |
Running a Multi-Page Layout
The MultiPageLayout class generates a set of page graphs, each of whose layouts fits into a given width and height. To calculate the actual layouts of the page graphs, it uses a core layout algorithm (property coreLayout).
MultiPageLayout differs from other major layout algorithms offered by yFiles for HTML in several ways:
-
The result of the layout is a set of graphs (the page graphs), bundled in MultiPageLayoutResult.
-
The original graph that is given as input is not modified in any way.
-
In addition to the elements of the original graph, the page graphs may contain newly created nodes and edges.
Although the MultiPageLayout is applied as described in Applying an Automatic Layout just like every other layout algorithm, the result of the layout calculation is not accessible without further setup. To calculate a multi-page layout, you need the following:
-
A core layout algorithm to actually compute the layouts of the page graphs (property coreLayout)
-
An instance of MultiPageLayoutData which automatically provides IDs for all nodes, edges, node labels, and edge labels of the model graph. This makes it possible to map between page graph items and original items by using methods like getOriginalItem.
-
The result has to be retrieved through a callback function defined as property layoutCallback before running the layout. The callback is invoked when the layout is finished and provides the MultiPageLayoutResult instance.
function runMultiPageLayout(graph: IGraph): IGraph[] {
  const resultGraphs: IGraph[] = []

  const layout = new MultiPageLayout({
    // As core layout (layout of the pages), use a hierarchical layout in this example
    coreLayout: new HierarchicalLayout(),
    // Define the callback which receives the result instance
    layoutCallback: (result) => {
      // Delegate to a method/factory to create IGraph implementations from the result instance
      // (the factory is not part of the API but available through Demo Code)
      for (let i = 0; i < result.pageGraphs.size; i++) {
        resultGraphs.push(createIGraph(result, i))
      }
    }
  })

  // Create the layout data instance
  const layoutData = layout.createLayoutData(graph)

  // Apply on the input graph
  graph.applyLayout(layout, layoutData)

  return resultGraphs
}|
Note
|
Note that the resulting page graphs in the MultiPageLayoutResult are of type LayoutGraph. The helper method in the example is custom code. The Processing the Result section outlines the ideas for implementing such a helper method. A full, runnable, more comprehensive example is shown in the Multi-Page Layout. |
|
Tip
|
MultiPageLayout uses unique IDs to relate page graph elements to their originals from the model input graph. In particular, the IDs are necessary to collect the information returned for connectors and proxy elements as part of the MultiPageLayoutResult. It is usually enough to rely on the automatic ID handling provided by the layout data class. Otherwise, IDs can be defined manually via data keys like NODE_ID_DATA_KEY. |
Options
- maximumPageSize
-
Specifies the maximum page dimensions (width and height) that the layout of a page graph must fit within.
- stopDuration
-
Sets the preferred time limit for the layout process. By default, the algorithm runs without a time restriction. Longer durations allow the algorithm to find a smaller set of page graphs, where each better utilizes the available page size. Also, this results in fewer connectors and proxy elements in the page graphs.
- MultiPageLayoutData<TNode, TEdge, TNodeLabel, TEdgeLabel>.nodeClusterIds
-
By default, MultiPageLayout automatically distributes the nodes from the original graph to the page graphs. This setting allows you to assign a cluster ID to each node, using an object. The algorithm then attempts to place nodes with the same ID onto the same page graph.
Processing the Result
MultiPageLayoutResult is the container that holds the results of the multi-page layout.
It provides access to all page graphs from the layout result and enables identification of original graph elements, connectors, and proxy elements via methods on the context, for example, getNodeType.
The example Building page graphs from the MultiPageLayoutResult shows a basic method to create IGraph instances for the computed page graphs. Here, the layout, i.e., the node’s bounds, the edge’s source and target port locations, and the bends are copied from the page (layout) graph. A complete, runnable, and more complex example is shown in the Multi-Page Layout, which can serve as a starting point for your own real-world applications.
function createIGraph(
  result: MultiPageLayoutResult,
  pageIndex: number
): IGraph {
  // Get the resulting page graph
  const page = result.pageGraphs.get(pageIndex)

  // Create the IGraph instance to copy the result to
  const graph = new Graph()

  // Copy all nodes
  const pageNodeToINode = new Map<LayoutNode, INode>()
  for (const pageNode of page.nodes) {
    // Create an INode instance for it with the same location and size
    const node = graph.createNode(pageNode.layout.bounds)
    pageNodeToINode.set(pageNode, node)

    // Depending on the type of node, the styling or other aspects may be changed
    // - In this example, the proxy and connector nodes get a diamond-shaped node style
    const nodeType = result.context.getNodeType(pageNode)
    if (
      nodeType === MultiPageNodeType.PROXY ||
      nodeType === MultiPageNodeType.PROXY_REFERENCE ||
      nodeType === MultiPageNodeType.CONNECTOR
    ) {
      graph.setStyle(
        node,
        new ShapeNodeStyle({ shape: ShapeNodeShape.DIAMOND })
      )
    }
  }

  // Copy all edges
  for (const pageEdge of page.edges) {
    const sourceNode = pageNodeToINode.get(pageEdge.source)!
    const targetNode = pageNodeToINode.get(pageEdge.target)!

    // Create an IEdge in the view graph
    const edge = graph.createEdge(sourceNode, targetNode)

    // Adopt port locations and bends from the page graph
    graph.setPortLocation(edge.sourcePort, pageEdge.sourcePortLocation)
    graph.setPortLocation(edge.targetPort, pageEdge.targetPortLocation)
    for (const pageEdgeBend of pageEdge.bends) {
      graph.addBend(edge, pageEdgeBend.location)
    }

    // Depending on the type of edge, more styling or other aspects may be configured
    const edgeType = result.context.getEdgeType(pageEdge)
    switch (
      edgeType
      // Additional edge styling or processing can go here
    ) {
    }
  }

  // Copying labels omitted in this example... see demo code for details

  return graph
}