Applying an Automatic Layout
Although the yFiles for HTML layout algorithms are tailored to the dedicated graph model of the layout part, the layouts can be directly applied to an IGraph using the adapter mechanisms described in this section. You do not need to work with the core LayoutGraph API unless you implement your own custom ILayoutAlgorithm or ILayoutStage (in that case, please see Customizing Automatic Layout).
Classes IGraph and GraphComponent provide methods to conveniently apply a layout directly to an IGraph or to a GraphComponent’s graph. These methods create a layout graph copy of the original IGraph, calculate the layout on that copy, and then transfer the new layout back to the original graph. Besides basic graph elements like nodes, edges, and labels, specific features like groups and tables are automatically converted as well.
To immediately apply the new layout after its calculation has finished, apply a layout algorithm to an IGraph using the applyLayout method. This is a synchronous call.
const graph = getMyGraph()
graph.applyLayout(new HierarchicalLayout())To apply the new layout with an animation, apply a layout algorithm to a GraphComponent (and its IGraph) using the applyLayoutAnimated method.
Method applyLayoutAnimated is a non-blocking, asynchronous call.
applyLayoutAnimated returns a Promise which is fulfilled after both the layout calculation and the animation to the
new layout have finished, and rejected if an error occurred.
const graphComponent = getMyGraphComponent()
await graphComponent.applyLayoutAnimated(
  new HierarchicalLayout(),
  TimeSpan.fromMilliseconds(250)
)|
Tip
|
Both methods provide overloads to specify supplemental layout data. |
The animation done by the applyLayoutAnimated method zooms the viewport to fit the graph bounds. To configure this and other aspects of the layout animation, use the LayoutExecutor class instead of the applyLayoutAnimated convenience method.
See section Configuring the Layout Executor for more details.
|
Important
|
Both the applyLayout method and the applyLayoutAnimated method, use the LayoutExecutor class to calculate the layout. However, build optimizers like tree-shaking tools do not recognize such implicit dependencies and might remove the yFiles for HTML modules that contain the implicit dependencies. To avoid this for class LayoutExecutor, use the ensure method to create an explicit dependency to the class and its module: |
LayoutExecutor.ensure()Layout Data
Besides global configuration settings that specify the overall arrangement of the graph, layout algorithms can also consider individual information for single graph elements. For example, this includes specifying a minimum edge length for each edge or a preferred location for each label.
This individual information is specified neither on the ILayoutAlgorithm instance nor directly on the graph. Instead, each layout style and each edge routing style has an associated type that provides the element-level options for the layout. These types are called layout data, and extend the generic LayoutData<TNode,TEdge,TNodeLabel,TEdgeLabel> type. Instances are created with factory methods on the layout algorithm instance.
To take the individual data into consideration, the layout algorithm and the layout data have to be applied together to the graph or GraphComponent:
const layout = new HierarchicalLayout()
// ... configure layout algorithm options ...

const data = layout.createLayoutData()
// ... configure graph specific options ...

const graphControl = getMyGraphComponent()
// apply both layout and layout data
await graphControl.applyLayoutAnimated(
  layout,
  TimeSpan.fromMilliseconds(250),
  data
)The properties of the various layout-specific LayoutData<TNode,TEdge,TNodeLabel,TEdgeLabel> subclasses are usually one of the following two types:
-
ItemMapping<TItem,TValue>: maps an element (commonly a graph item) to an arbitrary value
-
ItemCollection<TItem>: defines a collection of items or a single item for use in the layout algorithm.
| Property | Description |
|---|---|
Sets a single constant that is returned or mapped for every item. |
|
A map that can be modified to define values for specific items. By default, a mapper is already set, but it is possible to set a custom mapper instance. |
|
A function that is called to return a value for each item. Convenient for dynamically mapping values to items. |
| Property | Description |
|---|---|
Sets the items that this collection should contain. |
|
Sets the items as an enumerable instance that this collection should contain. |
|
Sets a predicate that is called for an item to decide whether the item is contained in this collection. |
|
A map that can be modified to define boolean values for specific items. By default, a mapper is already set, but it is possible to set a custom mapper instance. |
For both types, type conversion allows you to omit these intermediate properties and directly assign the property of the actual LayoutData<TNode,TEdge,TNodeLabel,TEdgeLabel>.
For example, the following code snippet configures layout data for HierarchicalLayout:
function initLayoutData(): HierarchicalLayoutData {
// Create a new instance of layout data for the hierarchical layout
const hierarchicalLayoutData = new HierarchicalLayoutData({
// as an example, set the edge thickness for all edges to a small value
edgeThickness: 0.5,
// next, we set up node halos for nodes that have a color set as tag
nodeMargins: (node) =>
node.tag !== null ? new Insets(15) : Insets.EMPTY
})
// In this example, we define port constraints for colored nodes:
// Blue nodes have all their incoming and outgoing edges on the right, and red nodes on the left.
hierarchicalLayoutData.ports.sourcePortCandidates = (edge) =>
getPortCandidateForEdge(edge, true)
hierarchicalLayoutData.ports.targetPortCandidates = (edge) =>
getPortCandidateForEdge(edge, false)
return hierarchicalLayoutData
}
function getPortCandidateForEdge(
edge: IEdge,
source: boolean
): EdgePortCandidates {
const color = source
? (edge.sourceNode.style as ShapeNodeStyle).fill
: (edge.targetNode.style as ShapeNodeStyle).fill
return color === Color.RED
? new EdgePortCandidates().addFreeCandidate(PortSides.LEFT)
: color === Color.BLUE
? new EdgePortCandidates().addFreeCandidate(PortSides.RIGHT)
: new EdgePortCandidates().addFreeCandidate(PortSides.ANY)
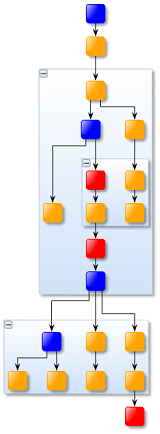
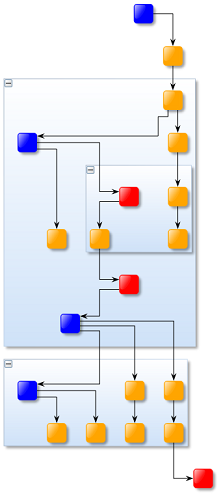
}This configuration changes the edge thickness, node margins, and port candidates for nodes and edges with only a few lines of code. The layout data tells the layout algorithm to consider the edges as a bit thicker than usual and to provide margins for nodes that are colored. Moreover, it specifies that the layout algorithm arranges the nodes and routes the edges such that blue nodes always have all incoming and outgoing edges on the right side and red nodes always on the left side. The effect of this configuration changes the resulting layout substantially, as shown in the following figure:
Combining Layout Data
For some use cases, you might need to combine multiple layout algorithms. For example, you could first use the organic layout to place the nodes and then apply an edge routing algorithm as a post-processing step to obtain orthogonal edge routes instead of straight-line edge routes.
For such cases, it can be necessary to combine multiple LayoutData<TNode,TEdge,TNodeLabel,TEdgeLabel> instances. You can do this using the class CompositeLayoutData<TNode,TEdge,TNodeLabel,TEdgeLabel> or by invoking the method combineWith.
Note that the LayoutData<TNode,TEdge,TNodeLabel,TEdgeLabel> instances are applied
in the order they appear in the Items collection.
This means that the later layout can override settings that are also specified by the former layout data.
Configuring the Layout Executor
To configure and customize either the creation of the layout graph or the animation from the old to the new layout, you can use the LayoutExecutor or LayoutExecutorAsync class instead of the applyLayoutAnimated convenience method. These classes provide the same interface for animation.
const layout = new HierarchicalLayout()
// configure layout algorithm options ...

const layoutData = new HierarchicalLayoutData()
// configure graph specific options ...

// configure the LayoutExecutor ...
const layoutExecutor = new LayoutExecutor({
  graphComponent,
  layout,
  layoutData,
  animationDuration: '1s'
})

// start layout calculation
await layoutExecutor.start()Below is a list of members you can configure for the executor instance. The first options specifically influence the animation:
- animationDuration
-
The duration of the animation. A duration of
0disables the animation, and the new layout is adopted immediately after the calculation finishes. - animateViewport
-
Specifies whether to animate transitions within the viewport, such as panning and zooming.
- easedAnimation
-
Specifies whether to use eased animation.
- updateContentBounds
-
Specifies whether the content bounds of the GraphComponent is updated upon completion.
The following options affect how the layout graph is created:
- portPlacementPolicies
-
Specifies how IPorts are changed by the layout algorithms. See section Keeping the Port Location for details.
- portAdjustmentPolicies
-
Specifies whether to place the ports at the outline of a node. See section Placing Ports on the Node’s Outline for details.
- portLabelPolicies
-
Specifies how labels at Ports should be treated by the layout algorithm. This is a mapping that is queried for each label at each port and defines whether the port label mimics a node label or an edge label for the layout. See section Placing Port Labels for details.
- tableLayoutConfigurator
-
Adds table information to the layout graph.
- hideEdgesAtEdges
-
Controls whether edges at other edges will be hidden from the layout graph. The default is
false, in which case temporary nodes are inserted for each source and target port of an edge that is owned by an edge.
Using Asynchronous Layout Calculation
To prevent blocking the UI thread for extended periods, or to execute multiple layouts in parallel, you can use the LayoutExecutorAsync class along with a corresponding LayoutExecutorAsyncWorker instance.
For long-running layouts or calculations, using Web Workers is the recommended approach to avoid a blocked user interface. Web Workers are supported in all modern browsers and allow parallel execution of JavaScript. However, since they run in a separate execution context, message passing is needed to allow the two contexts to communicate.
yFiles for HTML does not handle the communication between the invoking context and the worker. Instead, the transmission of data, as well as the setup and tear-down of the remote worker context, must be done outside the library, typically using Web Workers. With this approach, the two communicating parties can also operate across different web threads, browsers, tabs, or even remote machines. It is even possible to implement a remote layout server with just a few lines of integration code, as demonstrated in the node.js Demo.
Asynchronous layout execution involves two classes for the two parties involved: LayoutExecutorAsync and LayoutExecutorAsyncWorker.
The LayoutExecutorAsync typically runs on the browser’s UI thread. Its API is similar to that of LayoutExecutor, but instead of directly specifying an ILayoutAlgorithm, you provide a descriptor object that describes the algorithm. This avoids unnecessary dependencies on the algorithm in the UI thread, especially when it is not used there directly.
Since algorithms cannot be serialized, the descriptor is serialized instead. The worker process then uses this descriptor to reconstruct the layout algorithm. Alternatively, the layout algorithm can be hard-coded on the worker side, ignoring the descriptor. The LayoutExecutorAsync handles serialization of the descriptor, the graph, and the information encapsulated in LayoutData<TNode,TEdge,TNodeLabel,TEdgeLabel>, sending them to the LayoutExecutorAsyncWorker for processing.
The LayoutExecutorAsyncWorker runs on a separate thread, process, or machine to handle the computation-intensive tasks. It deserializes the information received from the UI thread, constructs the ILayoutAlgorithm, and performs the layout calculation. Once the layout is computed, the resulting graph is serialized and sent back to the UI thread. The updated graph can then be applied on the UI side, either instantly or through animation.
Since the most common scenario involves using a Web Worker for layout calculations, yFiles for HTML provides convenience methods to simplify communication between the UI thread and the worker.
// configure layout algorithm options ...
const layoutDescriptor: LayoutDescriptor = {
  name: 'HierarchicalLayout',
  properties: { nodeDistance: 20 }
}

const layoutData = new HierarchicalLayoutData()
// configure graph specific options ...

// create an asynchronous layout executor that calculates a layout on the worker
const executor = new LayoutExecutorAsync({
  messageHandler:
    LayoutExecutorAsync.createWebWorkerMessageHandler(worker),
  graphComponent: graphComponent,
  layoutDescriptor: layoutDescriptor,
  layoutData: layoutData,
  animationDuration: '1s'
})

// run the layout
await executor.start()The code above uses createWebWorkerMessageHandler to create a message
handler that returns a Promise. This Promise resolves once the resulting layout is received from the worker.
function applyLayout(
  graph: LayoutGraph,
  layoutDescriptor: LayoutDescriptor
): void {
  // create and configure the layout algorithm
  if (layoutDescriptor.name === 'HierarchicalLayout') {
    const layout = new HierarchicalLayout(layoutDescriptor.properties)

    // run the layout
    layout.applyLayout(graph)
  }
}

// initialize the helper class that handles the messaging between the main thread and the worker
LayoutExecutorAsyncWorker.initializeWebWorker(applyLayout)On the worker side, the LayoutExecutorAsyncWorker handles serialization and deserialization. For the Web Worker scenario, it provides the factory method initializeWebWorker that takes a handler function responsible for constructing and running the ILayoutAlgorithm.
The Web Worker Demo shows this approach. A more general solution where the layout is calculated on a layout server is provided in the node.js Demo.
Serialization of complex types
The serialization of the descriptor and the information encapsulated in the LayoutData<TNode,TEdge,TNodeLabel,TEdgeLabel> automatically handles most of the built-in types relevant for layout calculation. However, a few complex types cannot be serialized automatically for which an exception like this is thrown:
Serialization of <type> not supported.
This means that a property of your descriptor or layout data contains a type that cannot be serialized automatically. Typically, these are complex types, e.g., an ILayoutAlgorithm that is set for children of group nodes.
For example, the following layout data configuration cannot be serialized automatically.
It throws Serialization of OrganicLayout not supported.:
const executor = new LayoutExecutorAsync({
  messageHandler:
    LayoutExecutorAsync.createWebWorkerMessageHandler(worker),
  graphComponent,
  layoutDescriptor: {
    name: 'RecursiveGroupLayout'
  },
  layoutData: new RecursiveGroupLayoutData({
    nodeMargins: new Insets(50),
    // throws 'Serialization of OrganicLayout not supported.'
    groupNodeLayouts: (node) =>
      node.tag?.useOrganicLayout ? new OrganicLayout() : null
  })
})
await executor.start()To resolve serialization errors like this, you need to serialize the relevant raw information with the GenericLayoutData<TNode,TEdge,TNodeLabel,TEdgeLabel> instead and configure it on your Web Worker implementation directly.
To resolve the above example, where the children of each group node should be arranged with the OrganicLayout, you could serialize the following GenericLayoutData<TNode,TEdge,TNodeLabel,TEdgeLabel> instead:
// additional information needed for the layout configuration on the Web Worker
const genericLayoutData = new GenericLayoutData()
genericLayoutData.addItemMapping(groupLayoutDataKey, (node) => {
  return node.tag?.useOrganicLayout ? 'OrganicLayout' : null
})

// serializable layout data
const recursiveGroupLayoutData = new RecursiveGroupLayoutData({
  nodeMargins: new Insets(50)
})

// create an asynchronous layout executor that calculates a layout on the worker
const executor = new LayoutExecutorAsync({
  messageHandler:
    LayoutExecutorAsync.createWebWorkerMessageHandler(worker),
  graphComponent,
  layoutDescriptor: { name: 'RecursiveGroupLayout' },
  // combined layout data that is sent to the Web Worker
  layoutData: recursiveGroupLayoutData.combineWith(genericLayoutData)
})
await executor.start()And in the worker implementation, you would deserialize the raw information to configure the layout instance there:
LayoutExecutorAsyncWorker.initializeWebWorker(
  (graph, layoutDescriptor) => {
    if (layoutDescriptor.name === 'RecursiveGroupLayout') {
      const layout = new RecursiveGroupLayout({
        coreLayout: new HierarchicalLayout()
      })

      // Note: Automatically serialized layout data properties are applied already. For example, the
      // "nodeMargins" property of the RecursiveGroupLayoutData is already configured here.

      // Parse additional raw information to configure the layout.
      const groupLayoutInformation =
        graph.context.getItemData(groupLayoutDataKey)
      if (groupLayoutInformation) {
        // Configure the OrganicLayout on the basis of the additional raw information.
        const recursiveGroupLayoutData =
          layout.createLayoutData<LayoutGraph>()
        recursiveGroupLayoutData.groupNodeLayouts = (node) => {
          return groupLayoutInformation.get(node) === 'OrganicLayout'
            ? new OrganicLayout()
            : null
        }
        graph.context.pushLayer(recursiveGroupLayoutData)
      }

      layout.applyLayout(graph)
    }
  }
)This avoids serialization of the complex OrganicLayout instance.
|
Note
|
Depending on your layout requirements, e.g., static settings, you can consider omitting the client-sided configuration with the GenericLayoutData<TNode,TEdge,TNodeLabel,TEdgeLabel> and directly configure it as needed in the Web Worker implementation instead. |
Migrating from Synchronous to Asynchronous Layout Calculation
While we recommend starting with UI-thread-blocking layout execution using LayoutExecutor, you might want to consider switching to asynchronous layout calculation later during development if your graphs become too large, the algorithms too complex, and the execution time for your layouts becomes too long, blocking the UI thread. Note that for the vast majority of cases, blocking the UI thread for up to several seconds during a layout is acceptable. This is especially true if the layouts aren’t unexpected but are triggered by user interaction and when there is a "waiting" animation. A properly implemented "waiting" animation will also work with a blocked UI thread.
Migrating from a layout running on the main thread to an external multithreaded execution model is straightforward from an API perspective: LayoutExecutorAsync has almost the identical API as LayoutExecutor. Migrating code from the latter to the former will allow you to reuse the code that you have written before.
|
Note
|
For many applications, converting to asynchronous layout calculation isn’t necessary. If you keep the number of elements in your graphs to a reasonable, user-friendly level, most automatic layouts should execute quickly enough. The programming overhead and in the case of a server-backed layout the additional communication overhead might not be worth the gains. |
To prepare for the migration, split your current logic into two configuration steps:
One part is the creation of the ILayoutAlgorithm instance and its configuration. This part will be moved to the worker thread. It should be mostly independent of your application state and the contents of your graph. Since the layout will be running in a different context, all the information that you need to dynamically construct and configure the algorithm instance needs to be serialized and sent to the worker.
If your layout setup is independent in a pure function, you can simply move that function declaration to the worker thread.
All the parameters that you need to pass to that function need to be serialized and sent to the worker.
For this, LayoutExecutorAsync provides the layoutDescriptor property.
This property consists of a name and an arbitrary JSON block that can be sent to the worker context and passed to the
function that will create and perform the layout (see Configuring the LayoutExecutorAsync class to use a Web Worker).
If your code uses LayoutData<TNode,TEdge,TNodeLabel,TEdgeLabel> to pass additional per-item information to the layout algorithm, you can use the layoutData property. It can serialize that information and works with most built-in types relevant for layout calculation. However, some types cannot be serialized automatically (see Serialization of complex types).
|
Tip
|
Consider using GenericLayoutData<TNode,TEdge,TNodeLabel,TEdgeLabel> if you want to transfer custom data per graph item to the worker. |
Finally, set up the communication link as shown in Using Asynchronous Layout Calculation.
So the steps are:
-
Determine whether you need asynchronous layout calculation.
-
Choose the type of remote implementation and come up with a communication channel (e.g., Web Worker or layout server). Find ready-to-use example implementations in our demos:
-
Refactor your setup code and split off the creation of the ILayoutAlgorithm.
-
Replace the LayoutExecutor with LayoutExecutorAsync, removing the assignment of the layout algorithm and, if necessary, add your configuration variables to the layoutDescriptor.
-
Move the creation code for the layout algorithm to the code in the remote location that hosts the LayoutExecutorAsyncWorker, using the same function code in the callback passed to the constructor. In the callback function, after the ILayoutAlgorithm has been created, call method applyLayout, passing the
graphparameter that was also passed to the function.
Here’s an example that shows the steps described before:
await graphComponent.applyLayoutAnimated({
  layout: new MinimumNodeSizeStage(
    new HierarchicalLayout({ layoutOrientation: 'left-to-right' })
  ),
  animationDuration: '1s'
})

// or

await new LayoutExecutor({
  graphComponent,
  animationDuration: '1s',
  easedAnimation: true,
  layout: new MinimumNodeSizeStage(
    new HierarchicalLayout({ layoutOrientation: 'left-to-right' })
  )
}).start()type UserDefinedLayoutProperties = {
layoutOrientation: LayoutOrientationStringValues
}
function createLayout(
options: UserDefinedLayoutProperties
): ILayoutAlgorithm {
return new MinimumNodeSizeStage(
new HierarchicalLayout({
layoutOrientation: options.layoutOrientation
})
)
}
await new LayoutExecutor({
graphComponent,
animationDuration: '1s',
easedAnimation: true,
layout: createLayout({ layoutOrientation: 'left-to-right' })
}).start()new LayoutExecutorAsync({
messageHandler:
LayoutExecutorAsync.createWebWorkerMessageHandler(worker),
graphComponent,
layoutDescriptor: {
name: 'UserDefined',
properties: { layoutOrientation: 'left-to-right' }
},
animationDuration: '1s',
easedAnimation: true
})function applyLayout(
graph: LayoutGraph,
layoutDescriptor: LayoutDescriptor
): void {
// create and configure the layout algorithm
if (layoutDescriptor.name === 'UserDefined') {
const layout = createLayout(
layoutDescriptor.properties as UserDefinedLayoutProperties
)
// run the layout
layout.applyLayout(graph)
}
}
LayoutExecutorAsyncWorker.initializeWebWorker(applyLayout)The following example shows how to transfer custom data to the worker. For example, when using RecursiveGroupLayout, how to transfer the information about the inner layout algorithms of each group node.
// a mapping between group nodes and the layout algorithm that has to be applied
const mapper = new Mapper<INode, string>()
mapper.set(groupNode1, 'HierarchicalLayout')
mapper.set(groupNode2, 'OrganicLayout')
mapper.set(groupNode3, 'RadialLayout')

// create the container for the data
const layoutData = new GenericLayoutData()
// and register the information in the data using a node mapping with a given key
layoutData.addItemMapping(groupNodeToLayoutDataKey).mapper = mapper

// create an asynchronous layout executor that calculates a layout on the worker
new LayoutExecutorAsync({
  messageHandler:
    LayoutExecutorAsync.createWebWorkerMessageHandler(worker),
  graphComponent,
  layoutDescriptor: {
    name: 'UserDefined',
    properties: { coreLayout: 'HierarchicalLayout' }
  },
  layoutData,
  animationDuration: '1s',
  animateViewport: true,
  easedAnimation: true
})function applyLayout(
graph: LayoutGraph,
layoutDescriptor: LayoutDescriptor
): void {
if (layoutDescriptor.name === 'UserDefined') {
// get the data-provider registered by the generic layout data
const groupNodeLayoutsMap = graph.context.getItemData(
groupNodeToLayoutDataKey
)
// add the data-provider with RecursiveGroupLayout.GROUP_NODE_LAYOUT_DP_KEY (required by the RecursiveGroupLayout),
// after translating the string information to an actual layout algorithm instance
graph.context.addItemData(
RecursiveGroupLayout.GROUP_NODE_LAYOUT_DATA_KEY,
(dataHolder): ILayoutAlgorithm => {
const layoutName = groupNodeLayoutsMap!.get(dataHolder)
if (layoutName) {
switch (layoutName) {
case 'HierarchicalLayout':
return new HierarchicalLayout()
case 'RadialLayout':
return new RadialLayout()
case 'OrganicLayout':
return new OrganicLayout({
defaultMinimumNodeDistance: 75
})
}
}
return RecursiveGroupLayout.FIX_CONTENT_LAYOUT
}
)
// create and configure the layout algorithm
const layout = new RecursiveGroupLayout()
if (
layoutDescriptor.properties!['coreLayout'] === 'HierarchicalLayout'
) {
layout.coreLayout = new HierarchicalLayout()
}
// run the layout
layout.applyLayout(graph)
}
}
LayoutExecutorAsyncWorker.initializeWebWorker(applyLayout)All that is left then is to connect the main thread with the worker thread. See Using Asynchronous Layout Calculation for examples as well as these demos:
Aborting Layout Calculations
LayoutExecutor and LayoutExecutorAsync provide options to abort the layout calculation after a specified time period.
There are two ways to terminate the layout:
Stopping the layout calculation results in early termination, but the layout algorithm still tries to deliver a consistent result.
Canceling, in contrast, will end the layout calculation immediately, throwing an
Error, and any work done by the algorithm up to that point will be discarded.
- stopDuration
- cancelDuration
-
Properties to specify runtime thresholds before terminating a layout calculation.
|
Important
|
When layout calculation is ended immediately, the state of the ILayoutAlgorithm instance may become corrupted. Therefore, you have to create a new instance after each cancellation. |
The LayoutExecutor can be configured to stop or cancel the layout as shown in the following example:
const layout = new HierarchicalLayout()
// configure layout algorithm options ...

const layoutData = new HierarchicalLayoutData()
// configure graph specific options ...

// configure the LayoutExecutor to stop/cancel the layout after a specific time
const layoutExecutor = new LayoutExecutor({
  graphComponent,
  layout,
  layoutData,
  stopDuration: '10s',
  cancelDuration: '30s'
})

// start the layout calculation
await layoutExecutor.start()|
Note
|
Custom layout implementations can use the LayoutAbortController to support the termination mechanism.
The algorithm should call check at suitable places to determine whether the layout
calculation should proceed, speed up the calculation by forgoing details, or end with an Error.
The LayoutAbortController can be retrieved from the LayoutGraphContext.
|
Aborting with AbortSignal
A layout execution can also be canceled by passing an optional AbortSignal to
LayoutExecutor.start, LayoutExecutorAsync.start, or applyLayoutAnimated.
In case of the LayoutExecutor, cancelling the token calls cancel. Because JavaScript executes in a single thread, the layout calculation cannot be canceled on demand. However, the subsequent layout animation will be aborted and the layout result will be shown immediately.
In case of the LayoutExecutorAsync, its corresponding cancel is called. If a layout calculation is still running on the Web Worker the results are discarded and not applied to the graph. If the layout calculation was already completed and an animation is running, it will be aborted immediately and the layout result will be applied and shown immediately.
Edge-to-Edge Connections
By default, LayoutExecutor and applyLayoutAnimated are configured to support edge-to-edge connections.
The layout algorithms of yFiles for HTML do not natively support edge-to-edge connections. Therefore, these connections
must either be simulated or ignored. This behavior is controlled by LayoutExecutor's property
hideEdgesAtEdges. Setting this property to true will hide the edges from the
layout algorithms.
Whether it is better to simulate edge-to-edge connections or to hide the edges from the algorithm is highly dependent on the type of algorithm and the purpose of the graph.
To mimic edge-to-edge connections, LayoutExecutor inserts temporary nodes for each source or target port that is owned by an edge and removes these after the layout algorithm has finished. These temporary nodes might disturb the layer assignment in algorithms like hierarchical layout or tree layout. Also, the temporary nodes will break straight edge paths produced by layout algorithms like Organic Layout.