yFiles AJAX Components
Web applications are client/server applications consisting of a standard web browser for the client side which is served by a dedicated server component over a network like the internet or an intranet. Web applications have become more and more popular, since deployment, updates and maintenance are much easier than for desktop applications.
AJAX enables web applications that feel similar to desktop applications. This is achieved by dynamically exchanging parts of the displayed web page instead of (re-)loading web pages as a result of user interactions.
On the downside, more effort needs to be spent for creating a suitable client using only a standard web browser and JavaScript compared to a desktop application. Moreover, the underlying technology for dynamically changing the appearance of a displayed web page is not (yet?) fully standardized across different browsers. There are different frameworks available which ease the development of AJAX applications by dealing with browser differences and providing components which provide a higher level of functionality.
yFiles AJAX provides a basis for web applications that need to visualize and edit graphs, diagrams or networks. It consists of client and server side components.
The server side library of yFiles AJAX is based on the successful yFiles for Java library. The client side is realized in JavaScript. It is based on the Dojo toolkit and uses the AJAX approach.
From a high-level perspective yFiles AJAX can be described as follows.
yFiles AJAX ships with demo applications illustrating how to use it and how to add application specific functionality.
demos/src.
demos/web-content/html and demos/web-content/javascript.
Note that the sources are not available online, i.e. you cannot
get them from live.yworks.com.
There are three tutorials for using and extending yFiles AJAX.
How to run the web application containing the yFiles AJAX demo applications and tutorials is explained in the README.
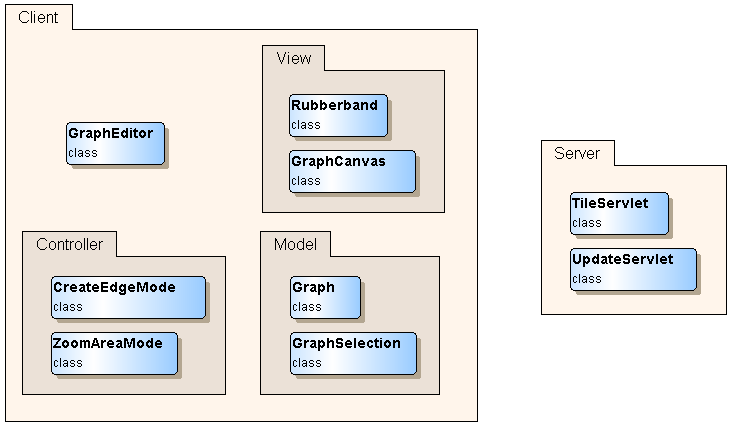
The following is a simplified overview of the logical components of yFiles AJAX.
The client side of yFiles AJAX is based on the Dojo toolkit. The client side components can be grouped with respect to the Model View Controller Pattern (MVC), since the architecture is similar to the yFiles for Java y.view package.
onNodeCreated or onEdgeCreationFailed
which allow listeners to react on changes in the graph.
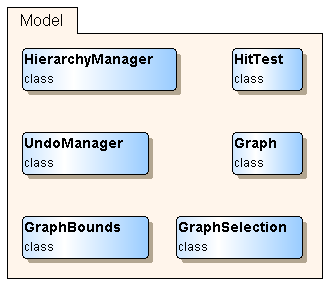
HitTest obtains the graph element bounds from the server when necessary and caches
these bounds. A hit test query is answered using the cached bounds without performing a
server request.
isGroupNode or getParent) of the graph (grouping and folding of nodes as in
the yFiles for Java library on the server). It also allows to update the
nested structure using the createGroup, moveToSubgraph or
closeGroup functions. Hence, it could be considered a client-side proxy for class y.view.hierarchy.HierarchyManager
on the server. Additionally, the client side hierarchy manager allows to specify which subgraph in the
hierarchy of nested graphs should be displayed (switchToSubgraph, switchToParent).
There hierarchy manager provides events like onCreateGroup and onSwitchToSubgraphFailed.
onUndo and onRedoFailed.
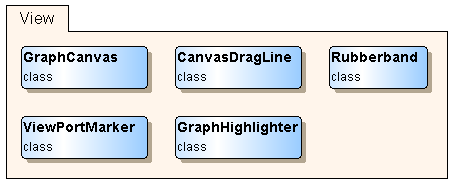
GraphCanvas can be used as an overview in conjunction with
the
ViewPortMarkerViewPortMarker marks the visible region
of the main GraphCanvas in the overview GraphCanvas and can be modified interactively.
GraphCanvas. This can be used
to implement a "Zoom Area" feature, for example.
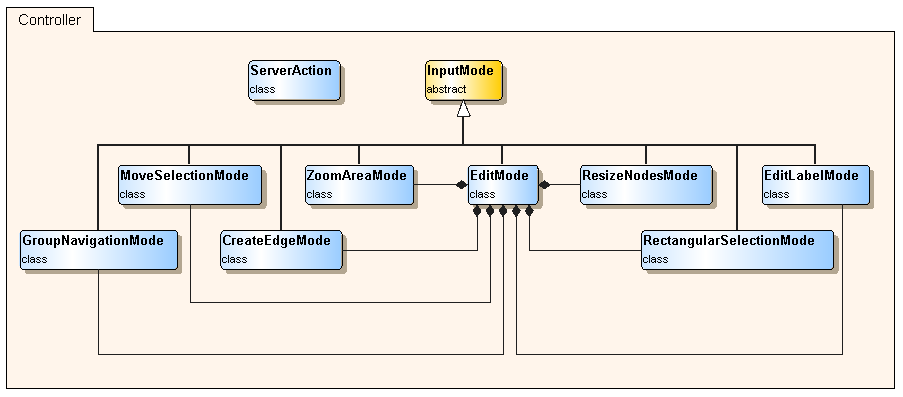
The controller part in the MVC pattern varies the most depending on the specific application.
yFiles AJAX provides the building blocks for a specific controller with the basic InputMode class, some
specific "one-shot" input modes which get activated for a particular task (like creating an edge or zooming
to an area of interest) and immediately finish after the task has been done. There is a main
input mode which handles some input directly and dispatches other input to specialized input handlers.
yFiles AJAX also provides a framework for adding custom server side actions. The framework contains a client side part, the ServerAction class, which wraps a call to a custom server side action.
The basic
InputMode![]() class defines the interface for several specific subclasses
like the
class defines the interface for several specific subclasses
like the CreateEdgeMode. An InputMode is initialized for a specific
GraphCanvas.
InputModes have a set of event handlers which are attached, if the InputMode
is activated (activate()). The event handlers are detached, if the InputMode
is deactivated (deactivate()).
InputModes can be chained using the setChild() function. If this is invoked
on an active parent input mode with a child input mode as its argument, the parent input mode
passes the control to the child by detaching its event handlers and activating the child.
The parent input is reactivated once the child is deactivated.
NavigationInputMode![]() uses
uses MoveViewportInputMode and PinchInputMode instances as child input modes in order to enable
basic graph navigation. This input mode is the default mode used by the GraphCanvas in order to enable
navigation gestures.
PinchInputMode![]() enables pinch-zooming on multitouch-enabled devices (iOS and Android >= 3.2).
enables pinch-zooming on multitouch-enabled devices (iOS and Android >= 3.2).
MoveViewportInputMode![]() enables viewport movement for mouse and touch gestures.
enables viewport movement for mouse and touch gestures.
ZoomAreaMode![]() is an input mode for zooming a canvas to a user-specified rectangular
region. It uses a
is an input mode for zooming a canvas to a user-specified rectangular
region. It uses a Rubberband to visualize the target region.
RectangularSelectionMode![]() is an input mode for selecting nodes and edges overlapping
a user specified rectangular region. The visualization of this input mode is similar to the
is an input mode for selecting nodes and edges overlapping
a user specified rectangular region. The visualization of this input mode is similar to the
yfiles.client.tiles.ZoomAreaMode. The selection made by the user is applied to a GraphSelection
instance supplied to the initializer. This input mode can optionally be made aware of the nesting structure
of the graph it acts upon by passing the hierarchy manager for the graph to its constructor. In this case,
group nodes are selected only if their bounds are totally encompassed by the selection area, instead of just
overlapping it. This allows selections inside a group node without selecting the group node itself.
The
GroupNavigationMode![]() provides opening and closing of group nodes and switching the display of the underlying canvas
to the inner graph of a group node or back to an outer graph.
provides opening and closing of group nodes and switching the display of the underlying canvas
to the inner graph of a group node or back to an outer graph.
On a touch device only the opening and closing of group nodes is supported.
MoveSelectionMode![]() is an input mode for moving a set of selected nodes. It is initialized with a
is an input mode for moving a set of selected nodes. It is initialized with a GraphSelection.
At activation time, it checks whether the selection
currently contains at least one node. For all selected nodes, it displays movable ghost objects.
It is assumed that the user pressed the left mouse button at activation time. If the user moves
the mouse, the ghosts are moved accordingly. If the user releases the left mouse button, the selected
nodes are moved to the current ghost positions. Then the mode deactivates itself. This input mode can also
optionally be made aware of the nesting structure of the graph. In this case it handles moving the selection
to a different level in the nesting structure, if the SHIFT key is pressed when the selection is dropped.
ResizeNodesMode![]() is an input mode for resizing a set of selected nodes. It is initialized with a
is an input mode for resizing a set of selected nodes. It is initialized with a GraphSelection.
At activation time, it checks whether the selection
currently contains at least one node. For all selected nodes, it displays resizable ghost objects.
It is assumed that the user pressed the left mouse button at activation time. If the user moves
the mouse, the ghosts are resized accordingly. If the user releases the left mouse button, the selected
nodes are resized to the current ghost sizes. Then the mode deactivates itself.
CreateEdgeMode![]() is an input mode for creating an edge with visual feedback.
At activation time it is assumed that the user pressed the left mouse button over the start node
of the edge to be created. While the user drags the mouse, an interactive line is displayed using
an instance of
is an input mode for creating an edge with visual feedback.
At activation time it is assumed that the user pressed the left mouse button over the start node
of the edge to be created. While the user drags the mouse, an interactive line is displayed using
an instance of yfiles.client.tiles.widget.CanvasDragLine. If the user releases the left mouse button,
the current mouse position is checked for a valid target node. If a target node is found, a new edge is created.
Finally, the mode deactivates itself.
Creating edges with bends is not supported.
EditLabelMode![]() is an input mode for creating node labels.
is an input mode for creating node labels.
The
EditMode![]() is the main controller for editing a graph. It uses the other input modes
as child input modes triggered by specific user gestures. For example, the
is the main controller for editing a graph. It uses the other input modes
as child input modes triggered by specific user gestures. For example, the MoveSelectionMode
is activated, if the user starts dragging with the mouse positioned over a selected node. Additionally,
further user gestures are handled without using extra input modes - for example, if the user
clicks on an empty space and there is no current selection, a new node will be created. The edit mode can optionally be made aware of the
nesting structure of the graph. In this case it initializes its child rectangular selection and move selection
modes to be aware of the nesting structure. Moreover, it only activates the create edge mode for group nodes,
if the user starts dragging the mouse at the border of the group node. On mouse drags inside a group node, the
edit mode activates the rectangular selection mode. The edit mode also handles clicks on the state label of
group nodes (e.g. opening a closed group node (folder node) on clicking on its plus sign).
The
ServerAction![]() wraps a call to a custom server side action and implements configurable facilities for providing
client side data to the server side action (e.g. a set of node ids). ServerAction also implements housekeeping tasks
on the client side, e.g. updating hit test data after a server side action which changed the graph.
It also provides hooks which are called before and after the server side action is invoked.
wraps a call to a custom server side action and implements configurable facilities for providing
client side data to the server side action (e.g. a set of node ids). ServerAction also implements housekeeping tasks
on the client side, e.g. updating hit test data after a server side action which changed the graph.
It also provides hooks which are called before and after the server side action is invoked.
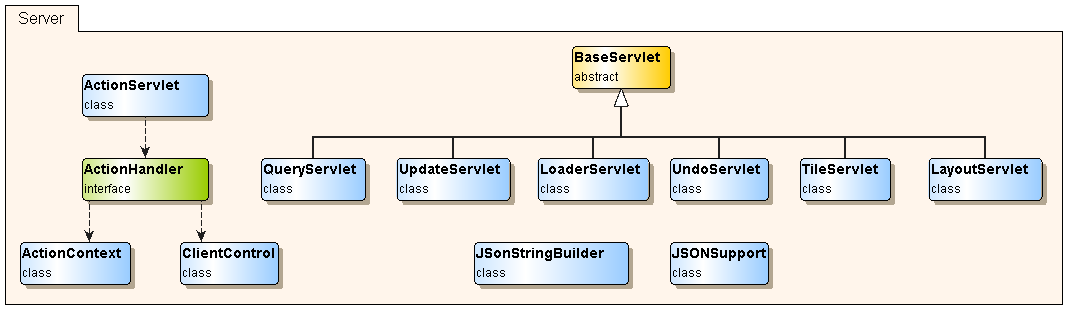
yFiles AJAX uses standard servlet technology for the server side. It provides the following servlets.
GraphCanvas is in SVG Mode. It exports the current graph model as an SVG document
and transfers it to the client.
The following classes and interfaces are used by the custom action framework.
ActionHandler implementation when it is called. The
ActionContext provides the client side context to the server side action.
ActionHandler when it is called. The
ClientControl allows to configure post processing steps that are executed
on the client after the server side action has been performed.
In addition, there are some support classes.
The yFiles AJAX distribution contains all the resources you need to run a web application using yFiles AJAX (except possibly the license file, which is included only in the evaluation distribution).
The Java libraries required for the yFiles AJAX server component are located in the
lib/java directory of the yFiles AJAX distribution.
The server side classes for yFiles AJAX including the servlets are contained in the
yfiles-ajax.jar. Note that this jar does not contain the demo sources or classes.
The classes in yfiles-ajax.jar require the
yFiles for Java library (y.jar).
In addition, to enable SVG mode, rendering of SVG nodes, and SVG export, ysvg.jar and batik.jar
are required.
These jars need to be deployed to the WEB-INF/lib subdirectory of your web application.
The additional download formats PDF, SWF, EMF and EPS can be enabled in the LoaderServlet, if the
yExport extension package
is available. A valid evaluation version of yExport also works during the evaluation period. Just deploy the two
jar files vectorgraphics.jar and yexport.jar
from the lib directory of the yExport distribution to the
WEB-INF/lib directory of your web application.
The server side sources for the demo applications are located in the demos/src directory.
The distribution contains two variants of a web application deployment descriptor (web.xml).
demos/web-content/WEB-INF/web.xml: The deployment descriptor that is used for the yFiles AJAX demo web application contains
both the servlet mappings of the yFiles AJAX server library and the additional mappings required for
the demo applications.lib/web.xml: Contains only the servlet mappings needed for the yFiles AJAX library - the demo servlets are not included.To use the yFiles AJAX server library, the servlet mappings need to be merged into the deployment descriptor of your web application.
The yFiles AJAX servlets are implemented in a way which allows you to put them into a virtual
subdirectory of your web application, if this is desired. You can for example add the prefix
/yfiles to all yFiles AJAX requests in the web.xml file, such that
/getImage becomes /yfiles/getImage, /createNode becomes
/yfiles/createNode and so on. In this case you have to adjust the yFiles AJAX
components you are using on the client accordingly, e.g. for an HTML page in the root directory
of your web application, which uses a yFiles AJAX GraphCanvas, add the baseUrl="yfiles"
attribute to the HTML markup of the div with the
dojoType="yfiles.client.tiles.widget.GraphCanvas" attribute.
According to section 2.1 c) of the license agreement it is mandatory to obfuscate the Java Jar file Redistributables before an application using yFiles AJAX can be shipped to customers.
More information on obfuscating the yFiles for Java y.jar file together with other jar files using
yFiles for Java such as the yfiles-ajax.jar and a jar containing your application code
can be found in the Developer's Guide for yFiles for Java in the
section on obfuscation.
Deploy your license file to the WEB-INF subdirectory of
your web application. The default name of the file is yfiles-ajax-license.xml.
If you want to use another name, you can do so by specifying the alternative name
as the value of the context parameter yfiles.ajax.license.file.name of your
web application. If for example your license file is called myLicense.xml add
the follwing XML snippet to your web.xml file between the display-name
element and the first servlet element.
  <context-param>
    <param-name>yfiles.ajax.license.file.name</param-name>
    <param-value>myLicense.xml</param-value>
  </context-param>
As an alternative to the license file deployment, the xml license data can also be specified programmatically
using the static method BaseServlet#registerLicense(String).
Note that if this approach is used for providing the license information, the registerLicense call needs to be
executed before any servlet requests are handled by the BaseServlet or any derived Servlets.
Note that the yFiles for Java library (y.jar) contained in an evaluation distribution is only valid for the evaluation period.
Therefore, when a yFiles AJAX evaluation license is replaced, the y.jar also has to be replaced with the one contained in the
corresponding yFiles AJAX distribution.
yFiles AJAX is deployed as a layered build yfiles-ajax.js on top of Dojo with
the provided build tool using this profile.
Details on the Dojo build system can be found at the Dojo website.
At the time of this writing they can be found here.
You can use the yfiles-ajax.js layer on top of your custom Dojo layers, if they
are based on the same Dojo version. In addition to just copying the layer file to your Dojo directory,
please do also copy the yfiles-ajax*.js files from the nls subdirectory,
which are generated by the build tool, to your dojo/nls directory.
If you are using a newer or patched Dojo version for your build, you may also be able to use yFiles AJAX on top of that, if there are no incompatibilities. For details, please see the official documentation on this topic.
Styles for yFiles AJAX widgets have been separated into necessary style (e.g. positioning
of tiles in the graph canvas) and optional style (e.g. color of selected graph elements
in the graph canvas). The latter can be customized by changing the centralized yfiles AJAX style
sheet or adding custom rules for the classes used for yFiles AJAX to your own style sheet.
The style sheet for yFiles AJAX can be found at
lib/resources/yfiles-ajax.css. There is a
separate style sheet for the
client side classes in the demos namespace
at demos/web-content/resources/style/yfiles-ajax-demos.css.
Note that the style sheets for yFiles AJAX follow the theme approach as found in Dojo.
All rules only apply, if the yfiles class is present at the target DOM element. This
is the so-called theme in Dojo terminology. Thus, the rules can be switched on or off by
adding or removing the yfiles class to or from the body tag of the HTML
page, since all DOM elements inherit the class from their ancestors and eventually from the
body tag. By defining similar rules with a different common class like
myCompany you can also switch the appearance back and forth. More information on
this topic is also available at the Dojo website.
At the time of this writing it can be found here.
Note that highlighting nodes or edges in a graph canvas uses div elements which are
invisible, unless the yFiles AJAX style sheet is used, or a custom CSS rule is defined for
div elements with the "yFilesGraphCanvasOverlay" class.
In order to display and interact with a graph on the client side in a web application using yFiles
AJAX, the graph needs to be cached for the session of the client initially. As a second step,
a GraphCanvas widget can display the cached graph via its setPath function.
The following sections describe two alternative approaches that allow to cache a custom graph for use with the
yFiles AJAX client canvas.
In the easiest case, the graphs are known in advance. In this case they can be saved as files to the
/resources/graphs/ and thus can be provided by the resource loading mechanism implemented
in the LoaderServlet. This approach is used in the Graph Viewer and Graph Editor demos. In this case, a call to
the setPath function of the GraphCanvas with the base name of the graph file, like
e.g. "computers.graphml", suffices. The GraphCanvas calls the load function of its
underlying graph, which sends a loadGraph request to the server. In the standard configuration,
this request is handled by the LoaderServlet, which checks whether a graph with the given name
is already cached for the session of the request. If this is not the case, it tries to load the graph as
a resource from the /resources/graphs/ directory.
There is an optional parameter for reloading graphs from the file system, if they are already cached.
The Dynamic Graph Demo shows how a (hierarchic) graph can be created programmatically on the server using
a simple ActionHandler implementation.
The demo also demonstrates some important specifics for working with dynamically created graphs in yFiles AJAX:
BaseServlet.newGraph() to create a new graph instance. This factory method will create
a HierarchyManager that is configured properly for working with hierarchic graphs in yFiles AJAX
(Use graph.getHierarchyManager() to work with this preconfigured hierarchy manager).GenericGroupNodeStateLabelProvider interface (usually the default StateLabelProviderPainter implementation)
as the GenericNodeRealizer.Painter. Otherwise, the state icon bounds won't be available for client-side
expand/collapse functionality.
Another example that creates a graph dynamically is the Collapsible Tree demo. The client sends
an initializeGraph request to the server which is handled by the initializeGraph
method in the TreeCollapserServlet. It creates a graph and caches the graph for the session
of the request using the cacheGraph method inherited from the BaseServlet. When
the request returns to the client, the GraphCanvas widget is configured to display this graph
by using the setPath function.
yFiles for Java provides some display options like adding drawables to the view and configuring the
renderer to display edge crossings using bridges, which are configured using the
y.view.Graph2DView instance used to display the graph or its renderer.
In a web application based on yFiles AJAX, you do not have access to a Graph2DView
instance. In fact, the Graph2DView class is used for rendering the graph on the
server side of yFiles AJAX, but there is typically more than just one graph view instance and
these instances are transient. In other words: the situation is not as easy as in a desktop
application using yFiles for Java.
In order to configure a view used for rendering a graph in yFiles AJAX, use the public static
method addViewConfigurator of the BaseServlet.
It accepts an object which implements the ViewConfigurator interface. The interface
has just one method configureView which is called with a Graph2DView
immediately before the view is used to render a graph. Adding a view configurator on the server
side code can be done as follows.
  BaseServlet.addViewConfigurator(graph, new ViewConfigurator() {
    public void configureView(Graph2DView view) {
      // do something with the view
    }
  });
View configurators can also be removed again. The ConfigureBridgesAction in the
Swimlanes demo is an example for switching the bridge visualization of edge crossings on and off.
The action framework eases adding custom actions to the server side of an application based on yFiles AJAX and triggering them from the client side. It removes the need to add new servlets on the server side and to do the housekeeping on the client side after graph changes on the server. The Swimlanes demo application is an example for using the framework.
On the server side, the ActionServlet dispatches requests
for custom actions to implementations of the ActionHandler interface. The
ActionHandler implementations are registered for an action id by means of
initialization parameters of the ActionServlet.
On the client side, there is a ServerAction class which defines the
context for a custom action, wraps the server call and takes care of updating client
side data for the hit test and the hierarchy manager (configurable). It can also
trigger the refresh of a canvas.
Instead of using new servlets, the server side functionality is implemented by
custom ActionHandler instances. They are called from the ActionServlet
with an ActionContext instance, which provides the client context,
and a ClientControl instance which can be used by the action
handler in order to control the client side post-processing after the server side action
has been performed.
A custom action is identified by a unique id and implemented by a combination of
a server side class implementing the
com.yworks.yfiles.server.tiles.servlet.action.ActionHandler interface,
and a suitably configured instance of the client side
yfiles.client.tiles.ServerAction class. The class implementing the
ActionHandler interface additionally needs to have a no-arguments
constructor.
The server side class implementing the action handler for the action identified by
an id is registered with the ActionServlet by means of an initialization parameter
specified in the web.xml file.
  ...
  <servlet>
    <servlet-name>ActionServlet</servlet-name>
    <display-name>Action Servlet</display-name>
    <description>handles custom actions</description>
    <servlet-class>com.yworks.yfiles.server.tiles.servlet.action.ActionServlet</servlet-class>

    <init-param>
      <param-name>yworks.demos.actions.swimlaneLayout</param-name>
      <param-value>com.yworks.yfiles.server.tiles.demos.SwimLaneLayoutAction</param-value>
    </init-param>
  </servlet>
  ...
The above snippet defines an action implemented by the class
com.yworks.yfiles.server.tiles.demos.SwimLaneLayoutAction and identified by
the id yworks.demos.actions.swimlaneLayout by using an initialization parameter
of the ActionServlet. The ActionServlet creates
instances of the action handlers specified as above using their no-arguments constructors and
associates them with the corresponding ids. Calls to the ActionServlet with the id
yworks.demos.actions.swimlaneLayout will then be dispatched to the corresponding
action handler instance.
The action handler instance which implements the custom action has access to the context
of the action specified at the client side by means of an ActionContext
instance which is passed to it by the ActionServlet. Usually, a graph is available
from the context. The client side can also specify sets of nodes and edges. In that case,
they are also available to the server side action from the context. Moreover, the context
can be queried for certain client-side resources, like a hit test or a hierarchy manager.
The action handler is also provided with a ClientControl instance. It is
used to control the post-processing on the client side after the request to the
ActionServlet has returned. While the ActionContext is an immutable
object, the action handler can change the settings of the client control instance.
For example, it can compute a new set of nodes and set it on the control to be returned
to the client side. An example for such an action is the SelectReachableNodesAction
used in the Swimlanes demo. The ClientControl is by default initialized
to update the client side hit test data, if a hit test instance is available at the client side.
The action can change this setting. Similar behavior is implemented for the hierarchy manager,
the selection and the canvas. The following code is used in the action handler for selecting
the nodes which are reachable from a given node, which is used in the Swimlanes demo application.
  public void handleAction(ActionContext context, ClientControl control) {
    Graph2D graph = context.getGraph();
    NodeList nodesIn = context.getNodes();
    if (graph == null || nodesIn.size() != 1) {
      control.setUpdateSelection(false);
      return;
    }

    boolean[] reached = new boolean[graph.N()];
    Node startNode = nodesIn.firstNode();
    GraphConnectivity.reachable(graph, startNode, true, reached);

    NodeList nodesOut = control.getNodes();
    nodesOut.clear();
    for (NodeCursor nodeCursor = graph.nodes(); nodeCursor.ok(); nodeCursor.next()) {
      Node node = nodeCursor.node();
      if (node != startNode && reached[node.index()]) {
        nodesOut.add(node);
      }
    }
  }
The graph and the nodes selected on the client side are fetched from the context, the reachable nodes are computed and set for the response using the control.
Another interesting feature of the action framework is used in the action handler of
the configure bridges action in the Swimlanes demo application. The corresponding
ServerAction instance on the client specifies the canvas since the canvas
needs to be refreshed when bridges are switched on or off. Bridges have no influence on
the node bounds or on the control points of the edges. Thus, the hit test
information does not need to be updated when running this action. Therefore, the action handler
switches off updating the client side hit test using control.setUpdateHitTest(false);.
The client side wrapper for a server side action is an instance of the class ServerAction.
It has a key-word-arguments-style constructor like e.g. a dojo.xhrPut call. The following
code snippet is a slightly simplified example for creating a ServerAction instance from
the Swimlanes demo.
      selectReachableNodesAction = new yfiles.client.tiles.ServerAction({
        id :        'yworks.demos.actions.selectReachableNodes',
        graph :     graph,
        selection : editMode.getSelection()
      });
If you call the run() function on the above created action, it will send a request
to the ActionServlet to perform the action registered with the id
yworks.demos.actions.selectReachableNodes on the server. The
selectReachableNodesAction on the client takes care of getting the currently selected
objects from the GraphSelection instance obtained by editMode.getSelection() in
order to send them to the server as part of the request. When the response for the request arrives from
the server, the selectReachableNodesAction will update the GraphSelection
according to the node ids, which are sent back from the server. Since neither a canvas, a hit test, nor
a hierarchy manager is available for the selectReachableNodesAction, there will be no
refresh of a canvas and no update of a hit test or hierarchy manager.
The ServerAction also provides hooks for functions to be called immediately before
a request is sent to the server and immediately after a response has arrived. They can be specified
with the preRun and postRun key words in the constructor, respectively
(The key word-argument pairs recognized by the constructor also have corresponding getters and setters).
The preRun and postRun functions will be executed in the scope of the
ServerAction instance, i.e. the ServerAction instance is accessible using
this inside these callbacks. The
treasure hunt tutorial contains
an example for using a custom response from the server side action.
    var distances;
    var hideTreasureAction = new ServerAction({
      id :        'yworks.demos.actions.hideTreasure',
      graphName : 'treasure-islands.graphml',
      postRun :   function() {
        // Parse the custom response from the server as JSON string.
        distances = JSON.parse(this.getCustomResponse());
      }
    });
The preRun callback is expected to return a boolean. If it returns false, the
action is canceled immediately. No request is sent to the server. There is an example for
canceling the run call in the Swimlanes demo.
    selectReachableNodesAction = new ServerAction({
      url:        '../yFilesAction',
      id:         'yworks.demos.actions.selectReachableNodes',
      graph :     graph,
      selection : editMode.getSelection(),
      preRun :  function() {
        if (this.getSelection().getSize() != 1) {
          // Do not do the server call. The server action only handles the case with one node.
          alert('Please select exactly one node for the "Select Reachable Nodes" action.');
          return false;
        } else {
          return true;
        }
      }
    });
The Swimlanes demo application uses four different ServerAction instances for performing a complete layout, an incremental layout, configuring bridges, and selecting the nodes reachable from a given node. These actions demonstrate different aspects of the action framework. The following code snippet shows the creation of the action for doing an incremental layout which is triggered when the user moves some nodes.
    changeLaneAction = new ServerAction({
      id :        'yworks.demos.actions.changeLane',
      canvas :    canvas,
      selection : editMode.getSelection()
    });
Specifying the canvas causes it to be immediately refreshed after the action
was performed. Since a canvas always has a hit test, the hit test data is also updated (otherwise,
nodes that changed their position during the layout could not be selected anymore).
The nodes
which were moved are those nodes which the user selected before. Thus, the selection maintained by the
edit mode is used to specify the nodes which need to change their lane for the server side.
Note that editMode.getSelection() returns a GraphSelection instance,
not the currently selected set of nodes. This instance is queried for the current selection whenever
the action runs.
For more details on the possibilities of the action framework please consider the Server Side API Documentation and the Client Side API Documentation.
yFiles AJAX offers two distinct render modes that determine how the diagrams are rendered in the browser. Choosing the optimal render mode for your yFiles AJAX application heavily depends on the size and visualization complexity of the diagrams used in the application, as well as on the user interaction requirements. The advantages and disadvantages of these render modes are explained in the following.
In Bitmap Mode, multiple bitmap tiles are generated on the server and sent to the client. As these bitmap tiles are created for a fixed clip and zoom level of the graph, all navigation gestures (zooming, panning) require multiple server requests for fetching new bitmap tiles.
On the other hand, the client-side rendering performance in Bitmap Mode is almost independent of the graph size and complexity.
In SVG Mode, a single SVG image is generated on the server, which is then scaled and translated on the client for zooming and panning. If the client-side graph visualization does not need to change (due to e.g. interaction functionality that modifies the graph structure, or level-of-detail functionality), a single SVG image can be used for all client-side navigation functionality.
As the SVG visualization is rendered as a part of the browser's DOM, the graph size and complexity will heavily influence the client-side rendering performance. However, zooming and panning in SVG Mode will be smoother than in Bitmap Mode for not overly complex graphs.
The following table shows how the requirements of a yFiles AJAX application can be taken into consideration when choosing the client-side render mode.
| Requirement | Implication for Render Mode |
|---|---|
Very large graphs (many nodes and edges) |
Favors Bitmap Mode, because in SVG Mode, the large SVG DOM that is included into the page will impact the browser's rendering performance. |
Complex graph item visualizations (node/edge realizers) |
Performance-wise, favors Bitmap Mode. However, zooming in Bitmap Mode results in blurred graph item visualizations while updating the bitmap tiles is in progress. In SVG Mode, the graph visualization always stays sharp (unless bitmap images have been used for visualization in the first place). |
Client-side graph modification, |
As soon as the graph structure or visualization changes, the client-side graph visualization needs to be updated through a server request, no matter which render mode is chosen. Therefore, the performance is again influenced by the graph size and visualization complexity, because both determine the amount of data that needs to be transferred in SVG Mode. In Bitmap Mode, the graph size and complexity does not influence the size of the transferred bitmap tiles that much. |
The render mode can be set using the method setRenderMode(String)
of the GraphCanvas widget.
GraphCanvas provides constants for the available render modes:
require(
  ["dijit/registry","yfiles/client/tiles/widget/GraphCanvas"],
  function(registry,GraphCanvas) {

     var canvas = registry.byId('canvas');

     // use SVG Mode
     canvas.setRenderMode(GraphCanvas.RENDER_MODE_SVG)

     // use Bitmap Mode
     canvas.setRenderMode(GraphCanvas.RENDER_MODE_BITMAP)
  };
);
If a yFiles AJAX application uses SVG Mode, it might be necessary to manually invalidate the SVG (i.e., request an updated SVG from the server).
For example, this is necessary for the level-of-detail functionality of the OrgChart demo application: as the nodes are rendered differently
depending on the zoom level, a new SVG image has to be requested after certain zoom changes. For this purpose,
GraphCanvas offers the method
invalidateSVG().
This method will request a new SVG image from the server, and use it to replace the current client-side SVG image.
The SVG Mode will work in all modern browsers that support inline SVG. Below you can find a table that shows the quality of support in a given browser version.
| Browser | Version | Operating System | Support | Notes |
|---|---|---|---|---|
| Internet Explorer | <= 8 | Windows | Unsupported | There is no support for SVG in these versions. |
| 9.0 | Windows | Good | ||
| Firefox | 6.0 | Windows, OS X | Very Good | |
| Chrome | 14 | Windows, OS X | Very Good | |
| Safari | 5.1 | Windows, OS X | Very Good | Very fast |
| Opera | 11.51 | Windows, OS X | Very Good |
When using SVG Mode it is highly encouraged to enable gzip compression on the web server. If GZip compression is not enabled, the performance of yFiles AJAX will suffer.
Instructions on how to enable GZip compression on Tomcat can be found in the Tomcat documentation: HTTP/1.1 and HTTP/1.0 Support
The value of compressableMimeType should contain the text/xml mime type and compressionMinSize
should be set to a small value.
If you need to display more than a single canvas in SVG Mode on the same website, you'll have to specify a prefix for the generated IDs within the SVG content.
To specify an ID, just set the svgPrefix attribute of the GraphCanvas to a
unique value.
require(
  ["dijit/registry"],
  function(registry) {
    registry.byId('canvas1').svgPrefix = 'canvas1';
    registry.byId('canvas2').svgPrefix = 'canvas2';
  }
);
yFiles AJAX provides a high-level API for touch devices that can be used to provide similar user experience for touch input and mouse input in yFiles AJAX web applications.
The GraphCanvas provides basic navigation gestures for touch and mouse devices out-of-the-box:
using the NavigationInputMode, both touch-based and mouse-based panning is enabled, as well as the pinch-to-zoom gesture
on devices that support multi-touch events (iOS and Android >= 3.2)
In addition, the GraphCanvas provides a number of high-level touch events that are dispatched when nodes, egdes,
node labels, or edge labels are tapped, double-tapped, or long-pressed.
For example, in order to perform the same action when a node was clicked or tapped:
require(
  ["dijit/registry"],
  function(registry) {

    function init() {
        var canvas = registry.byId('canvas');
        on(canvas,'TapNode',handleNodeGesture);
        on(canvas,'ClickNode',handleNodeGesture);
    }

    function handleNodeGesture(nodeId,hitInfo,evtOrTouch) {
        console.log("node clicked or tapped: "+nodeId);
    }
  }
);
For an extensive example that uses the yFiles AJAX touch and mouse event API, please have a look at the OrgChartEditorDemo
which provides the same functionality for touch and mouse input.
Currently, only the navigation-related input modes that are part of the yFiles AJAX client library support touch gestures. The editing-related input modes support only mouse input. For details, see above.
For multi-touch devices, the GraphCanvas provides the concept of a "Main Touch".
If multiple touches are active simultaneously (e.g. during a pinch gesture), the touch that started first
is considered the main touch.
For example, the Rubberband uses this concept in order to prevent flickering of the rubberband area:
_onTouchMove : function(touch) {
  if (this.canvas.isMainTouch(touch)) {
    this._resizeArea(touch);
  }
}
The yFiles AJAX servlets make heavy use of the ReadWriteLock class in order to prevent concurrent modifications to the server-side graph, while still allowing simultaneous read accesses by multiple threads. When implementing the server-side functionality of a yFiles AJAX application, we strongly advise to use read/write locks as well. To acquire and release read and write locks for a graph instance, the static convenience methods provided by the BaseServlet can be used. To make sure that all acquired locks are properly released, the following pattern should be used when working with read/write locks:
Acquire and release a read lock
BaseServlet.readLock(graph);
try {
  // read graph, e.g. iterate over the graph's nodes
} finally {
  BaseServlet.unlockRead(graph)
}
Acquire and release a write lock
BaseServlet.writeLock(graph);
try {
  // modify the graph, e.g. add nodes or edges
} finally {
  BaseServlet.unlockWrite(graph)
}
Copyright © 2006-2013 yWorks GmbH. All Rights Reserved.