Upon creation of a yFiles view, there is automatically also a Graph2D![]() instance created.
This is the graph that is actually displayed in the view.
Initially, this graph is empty.
instance created.
This is the graph that is actually displayed in the view.
Initially, this graph is empty.
We will now enhance our code from the previous lesson, the SimpleGraphViewer1 application, with a simple graph that displays a well-known message.
To this end, let's get the empty graph that is held by the view.
We will do so, ultimately at least, using the getGraph2D()![]() getter method of Graph2DView.
We won't call it directly, though, but by means of a convenience method in SimpleGraphViewer2
that returns the graph.
getter method of Graph2DView.
We won't call it directly, though, but by means of a convenience method in SimpleGraphViewer2
that returns the graph.
As shown in Example 1.2, “Adding the getGraph2D getter method”, we will add the getGraph2D getter to the constructor right after the view's creation.
Example 1.2. Adding the getGraph2D getter method
public SimpleGraphViewer2(Dimension size, String title) {
  view = createGraph2DView();
  graph = view.getGraph2D();
  frame = createApplicationFrame(size, title, view);
}
And in the main method, we will add the call to the convenience getter method.
Example 1.3. Calling the convenience getter method of SimpleGraphViewer2
public static void main(String[] args) {
  SimpleGraphViewer2 sgv =
    new SimpleGraphViewer2(new Dimension(400, 300),
                           SimpleGraphViewer2.class.getName());
  // Get the graph that is displayed in the view and "populate" it.
  sgv.populateGraph(sgv.getGraph());
  sgv.show();
}
The graph is handed over to a new method, populateGraph, that we will also add to our code, and which we will use to establish a simple graph structure.
The Graph2D class provides several methods for creating both nodes and edges.
For node creation, we will be using the createNode![]() method overload that allows us to specify the geometry of a node (i.e., location
and dimension), as well as a text for its label.
method overload that allows us to specify the geometry of a node (i.e., location
and dimension), as well as a text for its label.
As parameter values to the createEdge![]() method we use the two nodes that we have just created.
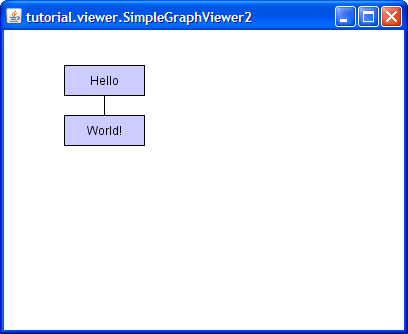
This gives us a directed edge from the "Hello" node to the "World!" node.
Example 1.4, “Creating a simple graph structure” shows the entire method.
method we use the two nodes that we have just created.
This gives us a directed edge from the "Hello" node to the "World!" node.
Example 1.4, “Creating a simple graph structure” shows the entire method.
Example 1.4. Creating a simple graph structure
/** Creates a simple graph structure. */
private void populateGraph(Graph2D graph) {
  // In the given graph, create two nodes...
  Node hello = graph.createNode(100, 50, 80, 30, "Hello");
  Node world = graph.createNode(100, 100, 80, 30, "World!");
  // ...and an edge between.
  graph.createEdge(hello, world);
}
Important
Ultimately, Graph2D's createNode and createEdge methods are all it takes to create a graph structure.
Although we haven't specified anything about the visual representation for the nodes or the edge that we have just created, they nevertheless show some "style." This is due to default settings maintained by a Graph2D.

Graph2D uses so-called realizers for the visual presentation of graph elements, and what we see in SimpleGraphViewer2 is how the default node realizer and edge realizer render nodes and edges:
- nodes are rendered as blue rectangles with a black, one-pixel border
- edges are rendered as black, one-pixel lines
In particular, a default edge realizer lacks any decoration that would indicate to a user the actual direction of an edge.
We will see in the next lesson how we can change the default realizers. Read on....